Targets are a way of setting production goals, and monitor fulfillment of those goals in real time. 💡See the Targets topic
A target must be based on a Target Distribution Schedule. The schedule says how much should be produced under a given period of time.
How to set up a Target Distribution Schedule
Navigate to Administration > Targets > Target Distribution Schedules
- Click on ➕ to add a new schedule
- Give the schedule a name
- Expand the schedule by clicking on the ▶️
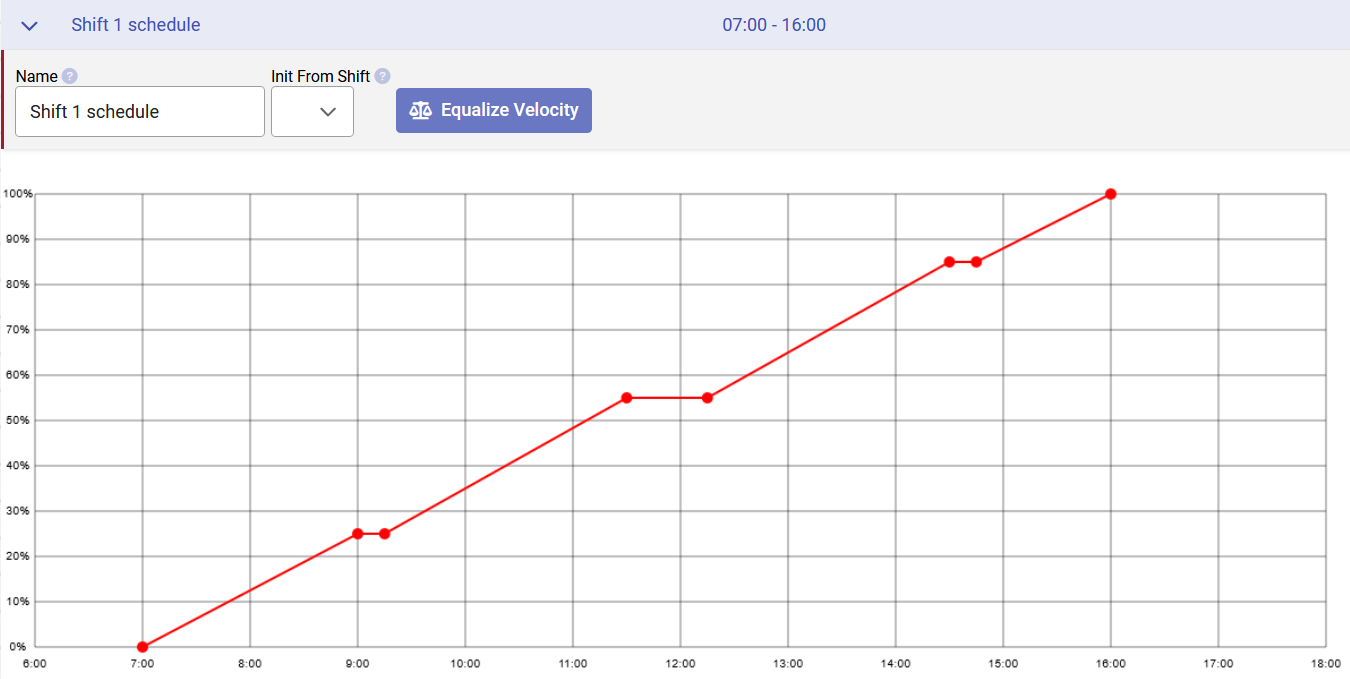
- The graph shows the production percentage on the Y axis and the time on the X axis
- Change the graph by clicking on the line to add a new point
- The point represents a time when production speed is adjusted up or down. For instance, in the example below production halts during the three breaks, and therefor production percentage does not increase
- 💡To remove a point on the line, simply drag it to the same place as the previous point
In the example below we see a schedule for a shift 7 AM to 4 PM, with three breaks. We start out at 0% at 7 AM, aiming for 25% completed production by 9 AM. A short break without any production, at 9.15 AM go from 25% to 55%. A longer break from 11.30 AM to 12.15 AM, then from 55% to 85%. Another short break, then from 85% to 100% completed production.
How to set up a Target
How many produced pieces the distribution schedule represents is determined first when applying the schedule on a target.
Navigate in the menu to Administration > Targets > Targets
- Click on ➕ to add a new target
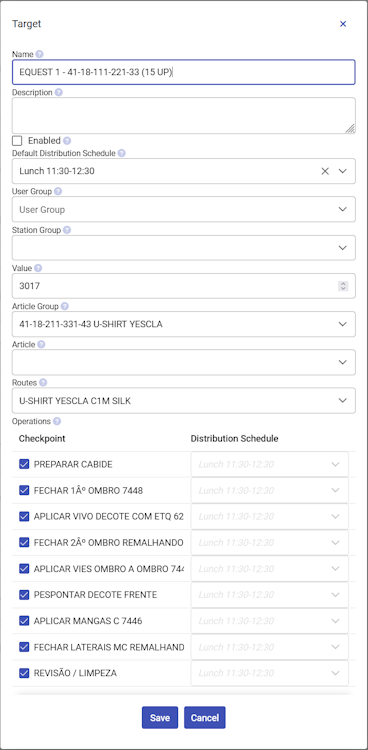
- Enter a Name
- Select the default distribution schedule from the dropdown menu
- This distribution schedule will be used as the default value for all operations part of tracking this target
- Enter the target value
- The target value is the production goal, that is, how many pieces to produce for this target
- So for the example above, reaching 100% would be producing this target value
- Optionally, select a target group. You can select any combination of these, but only either an Article Group or an Article
- Select a User Group
- By selecting a user group the target will only apply to that group. This can be used for instance if you have set up different user groups for each shift, and want how well the shifts perform
- Select a Station Group
- By selecting a station group you are indicating that the target will only apply to that group. This can be used for instance if you have multiple lines with similar stations and you want to compare their product of the same product
- Select an Article Group, or an Article
- By selecting an article group or an article you are indicating that the target will only apply to that group. For instance if you want to compare the production of two similar articles
- After selecting, you can choose the distribution schedule for that article's route. The dialog will show the route operations. The default distribution schedule is preselected, but you can select another schedule by clicking the checkbox for each separate operation
- Select a User Group
In the example below the target is set up with a target value of 3017 produced pieces, using a default schedule and for a specific article group. All operations are part of the target checkpoints
How to use targets
Targets can be used on a multiple of pages.
- Target Status
- Navigate to Production > Target Status
- Dashboards
- Navigate to Administration > Dashboards
- Add the Target Live
- The target live widget displays a speedometer, showing how well for the actual production count compares to the expected target count
- Add the Target Span
- The target span displays a line chart with lines for actual production count and expected target count