Updating Firmware
The firmware update page is used to update work stations and motors in the system.
Access to this page requires the Hardware Maintenance Permission.
⚠️ This is an expert feature and should be used with caution.
⚠️ Updating the system during production hours will cause a disturbance and should be avoided when possible.
⚠️ Do not turn off power to the ICU or the hardware system while an update is running.
⚠️ You can not run multiple updates in parallel, but several nodes can be updated simultaneously
Enabling packages
In order to download online firmware updates, the Access Token must be configured. Also the setting Firmware Packages must reflect the different types of hardware installed in your system.
Adding firmware packages will enable new options on the Firmware Update page.
Firmware Update Page
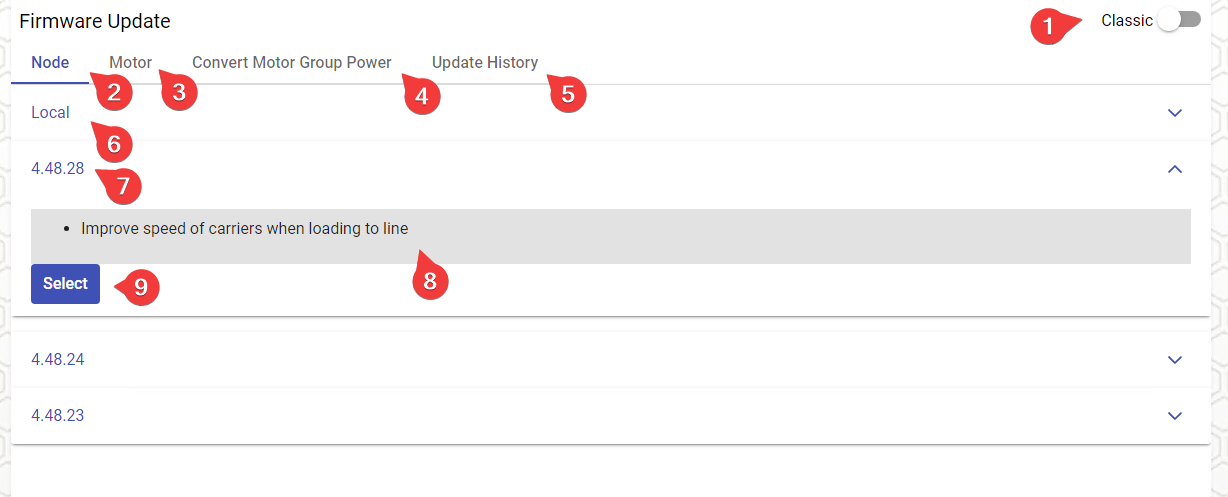
This page is found in the menu via Hardware > Firmware Update. The first tabs are the different types of enabled firmware packages.
| No | Description |
|---|---|
| 1 | Switch back to classic firmware update page. This will be deprecated in later versions |
| 2 | Update nodes. This is available when the 55924 package is enabled in settings. |
| 3 | Update motors. This is available when the 55929 package is enabled. |
| 4 | Functionality to Convert Motor Group Power after a firmware upgrade. |
| 5 | View the Update History. |
| 6 | Select this option to upload a hex file containing the firmware. |
| 7 | Select a version from the firmware versions made available online. |
| 8 | When expanded, a brief description of the changes in this version is shown |
| 9 | Push the "Select" button to continue to the next step |
Basic Update Process
Clicking an option, for example "Node", will list the versions available online with a short description text, and also give you the option "Local", which is when you providing a hex file yourself.
Once you have selected an online version or uploaded a hex file, you will see a list of nodes in the system of that model. For example, choosing "Node" will then give you a list of nodes with article number 55924, which is mostly regular stations and line servers.
No nodes have been selected by default, so you must first make a selection of which nodes to update.
Selecting nodes to update
| No | Description |
|---|---|
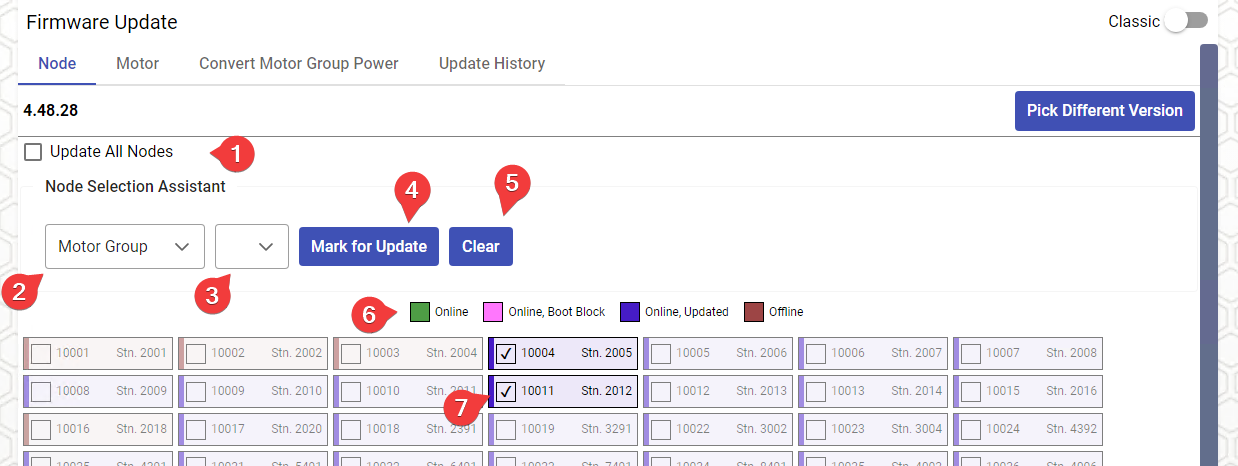
| 1 | Update all compatible nodes. Checking this will mark everything in the list and hide the node selection assistant. |
| 2 | Node grouping option - Station Group, Motor Group, ICU, Node Type, Line |
| 3 | Node group - Depending on selection in (2) will list station groups, motor groups etc |
| 4 | When the grouping option and group has been selected, push to mark all belonging nodes to update |
| 5 | Reset selection |
| 6 | Legend showing meaning of colors in node list |
| 7 | Manually clicking the checkbox will select or unselect a node to update |
Advanced Selections
Unclicking the "Update All Nodes" gives more fine grained options on picking the nodes to update.
It is now possible to manually click the nodes to select them for an update. There is also a selection assistant that can help with selecting a group of nodes.
- Station Group - Select all nodes that are associated with stations in a station group. If the stations are using separate nodes for unloading, they will not automatically be included and will have to be added separately.
- Motor Group - Select all motor nodes in a motor group
- ICU - Select all nodes belonging to a specific ICU
- Node Type - Enter a node type that should be targeted for update
- Line - Enter a line number to target all nodes located on that line
Pressing "Mark for Update" button will add your choice to the selection of nodes to update.
Pressing "Clear" will clear the list of nodes to update and let you restart the selection.
The Node List
If you do not have the "Update All Nodes" option active, you can click individual nodes to add or remove them from the selection.
Each node will display it's status with a specific color.
- Green - Online, running different firmware than the selected (or you have manually uploaded a hex file)
- Blue - Online, running the firmware you have selected.
- Pink - Online, in boot block ready to accept a firmware file.
- Red - Offline - Not currently possible to update.
Basic Controls
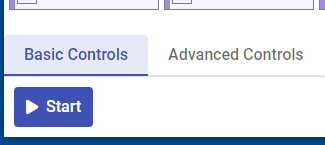
Basic controls is just a button to start updating the selected nodes. This automatically does several steps
- Send message to all selected nodes to enter boot block.
- Wait for nodes to report back that they have entered boot block.
- If no report within a certain time, send out messages asking nodes for their status.
- If still not entered boot block, retry the last few steps again.
- If still not entered boot block, prompt user whether to continue or abort the update.
- Broadcast the firmware.
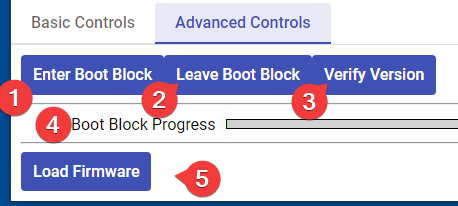
Advanced Controls
If you want more control of the specific actions of the update process, you can use the advanced tab. If you use the buttons on this tab, you must manually perform all the steps of the update process.
| No | Description |
|---|---|
| 1 | Enter Boot Block - Make the selected nodes enter Boot Block mode. The progress bar under the row of buttons will show the percentage of nodes that has succeeded in entering Boot Block mode. When it reaches 100%, all the selected nodes are ready to receive the firmware file. |
| 2 | Leave Boot Block - If you want to abort an update, you can press this button before you have begun loading the firmware. The nodes will go back to normal operating state. |
| 3 | Verify Version - This will query the nodes for their current version, which is sometimes required to verify that a node is in boot block. |
| 4 | Progress Indicator - This shows the progress of how many nodes have entered boot block necessary for performing the update. |
| 5 | Load Firmware - Send the firmware file. |
Warnings during Update
There are two cases when the system will ask the user to confirm.
- Offline Nodes - If you have offline nodes in your selection when you start the update, you will be asked to confirm if the update should proceed. At this stage no changes have been made, so aborting will allow you to change your selection again.
- Failure to enter Boot Block - The system will attempt several times to put the selected nodes into Boot Block mode, which is the state they need to be in to accept the firmware file. If the system does not manage to put all selected nodes into Boot Block it will ask the user to confirm. If the user accepts, the firmware will proceed with a partial update. If the user aborts, the nodes already in boot block will be returned to their normal operating state.
Convert Motor Group Power
This is a quick conversion tool that is useful when putting out a motor firmware that changes the effect calculation.
The adjustment process will only apply to the checked motor groups. Clicking the checkbox in the table header will check all motor groups.
On this page you can either choose
- Absolute - Change the power limit by a fixed amount up or down for all checked motor groups
- Relative - Change the power limit relative to their previous value by a percentage.
Select Absolute or Relative, then drag the slider to the required value.
No changes are made until you push the "Apply" button.
Update History
This tab lets you view the history of firmware updates that has been performed. The same information is also available when viewing the maintenance log for a specific node on the metrics page.
The "Nodes" column will present the number of nodes affected. Clicking on a cell will show a popup with the list of affected nodes.
You may also change the date interval to only show firmware updates in that interval.
Enabling packages
In order to download online firmware updates, the Access Token must be configured. Also the setting Firmware Packages must reflect the different types of hardware installed in your system.
Adding firmware packages will enable new options on the Firmware Update page.
Firmware Update Page
This page is found in the menu via Hardware > Firmware Update. The first tabs are the different types of enabled firmware packages.
| No | Description |
|---|---|
| 1 | Switch back to classic firmware update page. This will be deprecated in later versions |
| 2 | Update nodes. This is available when the 55924 package is enabled in settings |
| 3 | Update motors. This is available when the 55929 package is enabled |
| 4 | Functionality to Convert Motor Group Power after a firmware upgrade |
| 5 | View the Update History |
| 6 | Select this option to upload a hex file containing the firmware |
| 7 | Select a version from the firmware versions made available online |
| 8 | When expanded, a brief description of the changes in this version is shown |
| 9 | Push the "Select" button to continue to the next step |
Basic Update Process
Clicking an option, for example "Node", will list the versions available online with a short description text, and also give you the option "Local", which is when you providing a hex file yourself.
Once you have selected an online version or uploaded a hex file, you will see a list of nodes in the system of that model. For example, choosing "Node" will then give you a list of nodes with article number 55924, which is mostly regular stations and line servers.
No nodes have been selected by default, so you must first make a selection of which nodes to update.
Selecting nodes to update
| No | Description |
|---|---|
| 1 | Update all compatible nodes. Checking this will mark everything in the list and hide the node selection assistant. |
| 2 | Node grouping option - Station Group, Motor Group, ICU, Node Type, Line |
| 3 | Node group - Depending on selection in (2) will list station groups, motor groups etc |
| 4 | When the grouping option and group has been selected, push to mark all belonging nodes to update |
| 5 | Reset selection |
| 6 | Legend showing meaning of colors in node list |
| 7 | Manually clicking the checkbox will select or unselect a node to update |
Advanced Selections
Unclicking the "Update All Nodes" gives more fine grained options on picking the nodes to update.
It is now possible to manually click the nodes to select them for an update. There is also a selection assistant that can help with selecting a group of nodes.
- Station Group - Select all nodes that are associated with stations in a station group. If the stations are using separate nodes for unloading, they will not automatically be included and will have to be added separately.
- Motor Group - Select all motor nodes in a motor group
- ICU - Select all nodes belonging to a specific ICU
- Node Type - Enter a node type that should be targeted for update
- Line - Enter a line number to target all nodes located on that line
Pressing "Mark for Update" button will add your choice to the selection of nodes to update.
Pressing "Clear" will clear the list of nodes to update and let you restart the selection.
The Node List
If you do not have the "Update All Nodes" option active, you can click individual nodes to add or remove them from the selection.
Each node will display it's status with a specific color.
- Green - Online, running different firmware than the selected (or you have manually uploaded a hex file)
- Blue - Online, running the firmware you have selected.
- Pink - Online, in boot block ready to accept a firmware file.
- Red - Offline - Not currently possible to update
Basic Controls
Basic controls is just a button to start updating the selected nodes. This automatically does several steps
- Send message to all selected nodes to enter boot block.
- Wait for nodes to report back that they have entered boot block.
- If no report within a certain time, send out messages asking nodes for their status.
- If still not entered boot block, retry the last few steps again.
- If still not entered boot block, prompt user whether to continue or abort the update.
- Broadcast the firmware.
Advanced Controls
If you want more control of the specific actions of the update process, you can use the advanced tab. If you use the buttons on this tab, you must manually perform all the steps of the update process.
| No | Description |
|---|---|
| 1 | Enter Boot Block - Make the selected nodes enter Boot Block mode. The progress bar under the row of buttons will show the percentage of nodes that has succeeded in entering Boot Block mode. When it reaches 100%, all the selected nodes are ready to receive the firmware file |
| 2 | Leave Boot Block - If you want to abort an update, you can press this button before you have begun loading the firmware. The nodes will go back to normal operating state |
| 3 | Verify Version - This will query the nodes for their current version, which is sometimes required to verify that a node is in boot block |
| 4 | Progress Indicator - This shows the progress of how many nodes have entered boot block necessary for performing the update |
| 5 | Load Firmware - Send the firmware file |
Warnings during Update
There are two cases when the system will ask the user to confirm.
- Offline Nodes - If you have offline nodes in your selection when you start the update, you will be asked to confirm if the update should proceed. At this stage no changes have been made, so aborting will allow you to change your selection again.
- Failure to enter Boot Block - The system will attempt several times to put the selected nodes into Boot Block mode, which is the state they need to be in to accept the firmware file. If the system does not manage to put all selected nodes into Boot Block it will ask the user to confirm. If the user accepts, the firmware will proceed with a partial update. If the user aborts, the nodes already in boot block will be returned to their normal operating state.
Convert Motor Group Power
This is a quick conversion tool that is useful when putting out a motor firmware that changes the effect calculation.
The adjustment process will only apply to the checked motor groups. Clicking the checkbox in the table header will check all motor groups.
On this page you can either choose
- Absolute - Change the power limit by a fixed amount up or down for all checked motor groups
- Relative - Change the power limit relative to their previous value by a percentage.
Select Absolute or Relative, then drag the slider to the required value.
No changes are made until you push the "Apply" button.
Update History
This tab lets you view the history of firmware updates that has been performed. The same information is also available when viewing the maintenance log for a specific node on the metrics page.
The "Nodes" column will present the number of nodes affected. Clicking on a cell will show a popup with the list of affected nodes.
You may also change the date interval to only show firmware updates in that interval.